How to Build a Simple DIY Wooden Bird Feeder: A Step-by-Step Guide
Attracting local birds to your backyard is one of the most rewarding parts of birdwatching. While store-bought feeders work fine, crafting your own wooden hopper-style feeder allows you to customize the size, ensure safe materials, and enjoy a fun weekend DIY project.
Below is a complete guide with step-by-step instructions and assembly diagrams to help you build a durable, weather-resistant bird feeder.
Related Posts
-
How to Bond With a Bird That Doesn’t Like Humans The Long Road Home: How to Bond with a Bird That Doesn't Trust Humans Some birds arrive already…
-
How to Convince Your Parents to Get You a Bird The Feathered Proposal: How to Convince Your Parents to Get You a Bird You’ve done the research. You’ve…
-
How to Stop Your Bird from Biting You The Beak Whisperer: How to Stop Your Bird from Biting You You’ve built the trust. You’ve earned the…
-
How to Teach Your Bird to ‘Step Up’ The Foundation Skill: How to Teach Your Bird to 'Step Up' "Step up" is the handshake of the…
-
How To Keep A Bird’s Trust Trust Busters: The Biggest Mistakes That Destroy a Bird's Trust You did the work. You sat patiently, offered…
Step 1: Gather Materials & Tools
Before starting construction, prepare your tools and lumber. Cedar, redwood, or pine (untreated) are ideal choices because they withstand outdoor elements naturally without releasing harmful chemicals into birdseed.
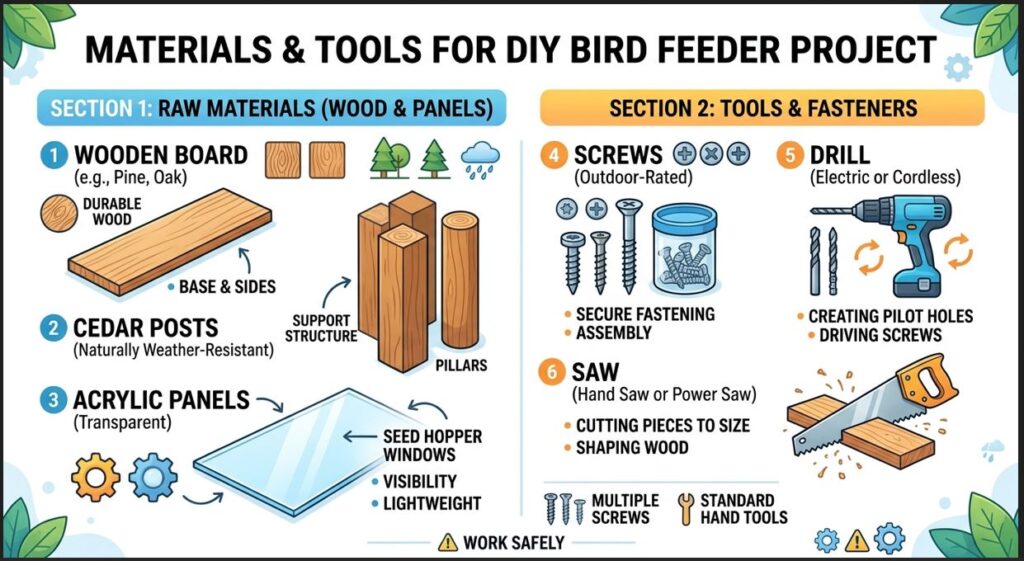
Required Materials & Tools:
-
Lumber: 1″ × 6″ board (Cedar or Pine), roughly 5–6 feet long
-
Clear Acrylic Panels: Two pieces cut to 6″ × 8″ (for seed reservoir windows)
You Might Also Like
-
How to Introduce a New Bird to Its New Home The Homecoming: How to Introduce a New Bird to Its New Home The carrier door opens. Your new…
-
How To Get A Bird Out Of Your House A Guest in the Gable: How to Get a Bird Out of Your House Without Smashing the Chandelier…
-
How to Introduce Your New Bird to Your Dog The Careful Introduction: How to Introduce Your New Bird to Your Dog Dogs and birds can coexist peacefully—some…
-
How to Get a Bird to Trust You The Long Game: How to Get a Bird to Trust You Trust with a bird is not given.…
-
How To Stop A Bird From Plucking The Feather Puzzle: How to Help a Bird That Plucks You walk past the cage and see another…
-
-
Fasteners: Exterior wood screws (1¼ inch) or galvanized finish nails
-
Hanging Hardware: Two heavy-duty steel eye-screws & strong wire or rope
-
Tools: Hand saw or miter saw, electric drill with bits, sandpaper (120-grit), safety goggles
[Menu:how to]
Step 2: Cut & Assemble the Base and Frame
Begin by measuring and cutting your wooden pieces according to the project dimensions:
-
Base: 1 piece (8″ × 6″)
-
Roof Panels: 2 pieces (9″ × 7″ for the long slope; 9″ × 6.25″ for the overlapping slope)
-
Side Posts/Walls: 2 pieces cut with a 45-degree angled roof bevel at the top
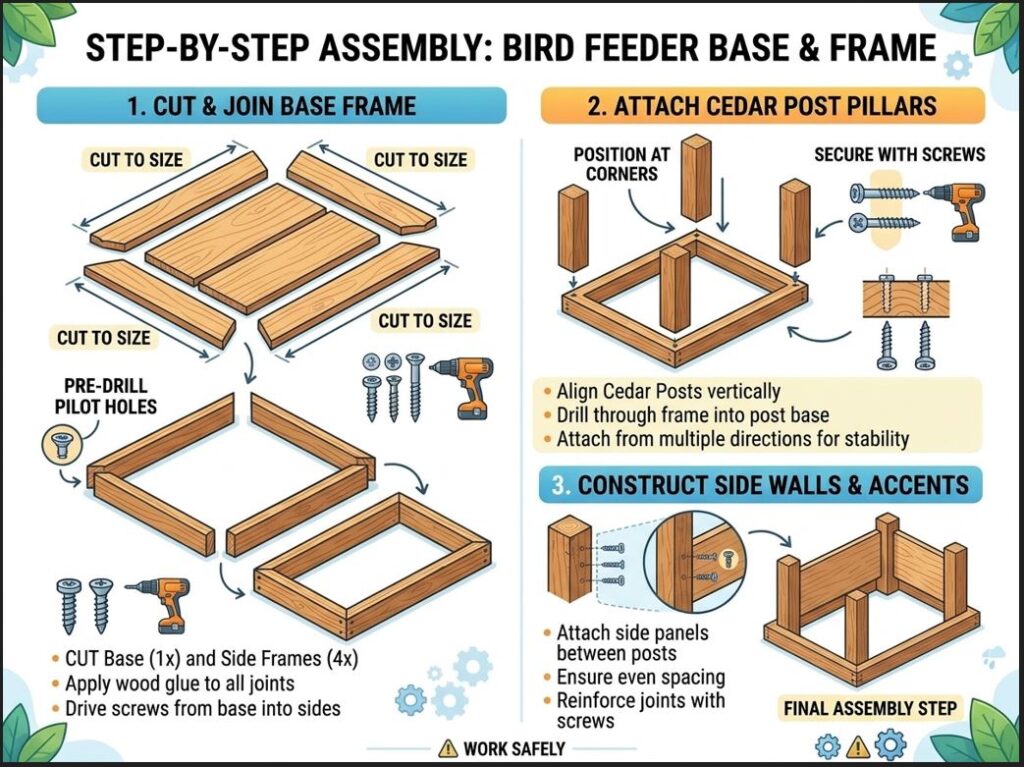
Instructions:
-
Prepare Drainage: Drill four evenly spaced $\frac{1}{4}$-inch drainage holes in the bottom base piece to prevent rainwater from pooling and molding the seed.
-
Attach Side Frames: Fasten the side support posts to the outer edges of the base plate using wood screws from underneath.
-
Pre-drill Holes: Always pre-drill screw holes to keep thin cedar boards from splitting.
Step 3: Insert Seed Windows & Roof Attachment
The clear acrylic sides allow you to monitor seed levels while protecting the grain from wind and rain.
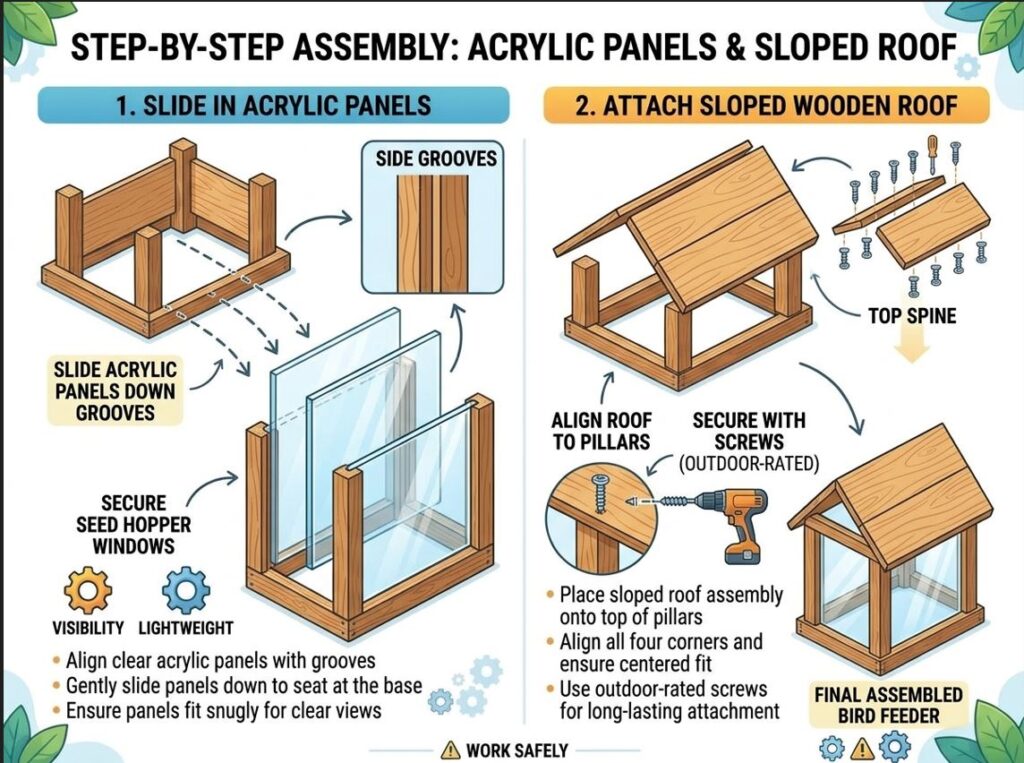
Instructions:
-
Slide in Acrylic Sheets: Cut vertical channels into the inner sides of the side frames, or secure small wooden cleats to create grooves. Slide the acrylic panels down into place. Leave a $\frac{1}{2}$-inch gap at the bottom so seed can flow onto the feeding tray smoothly.
-
Mount the Fixed Roof Half: Secure one half of the sloped roof onto the top angle of the side posts.
-
Optional Hinged Roof: Attach the second roof panel using a waterproof rubber hinge or stainless steel butt hinges to allow easy opening for seed refilling.
Step 4: Add Mounting Hardware & Finishing Touches
With the structure assembled, add hardware for secure hanging outdoors.
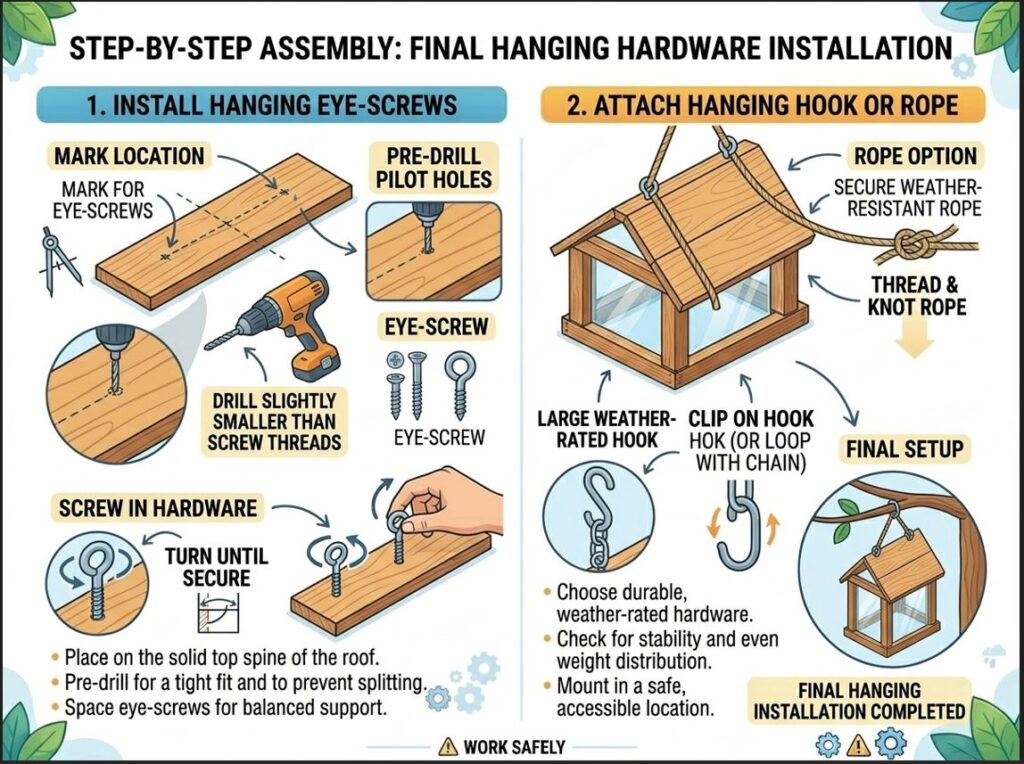
Instructions:
-
Install Eye-Screws: Centrally pre-drill two holes on the ridge peak of the roof and tightly thread in heavy-duty zinc-coated or stainless steel eye-screws.
-
Attach Rope or Wire: Thread braided steel cable or weather-resistant polypropylene rope through the eyelets and tie securely.
-
Sand & Protect: Lightly sand any rough edges around perches and tray edges. Avoid painting or staining the interior where birdseed touches. If finishing the exterior, use non-toxic, water-based outdoor sealant.
Tips for Hanging & Maintenance
-
Placement: Hang your feeder at least 5 to 6 feet above the ground, ideally near trees or shrubs for cover, but far enough from low branches to prevent squirrel raids.
-
Cleaning: Clean the feeder every two weeks with a solution of 9 parts water to 1 part bleach. Ensure it dries completely before refilling with seed.