Backyard Bird Photography Tips for Beginners: From Your Window
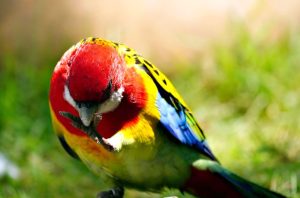
You don’t need a giant lens or a trip to the wilderness to capture beautiful bird photographs. Your own backyard, balcony, or a local park is a perfect stage. The secret isn’t just expensive gear—it’s understanding light, practicing patience, and getting a little closer to the everyday wildlife around you.
This beginner’s guide strips away the complexity. We’ll cover how to use the gear you likely already have, set up a simple “photo blind” at your window, and employ timeless techniques to turn common visitors like Rainbow Lorikeets or Superb Fairy-wrens into stunning photographic subjects.
Related Posts
-
Lorikeet vs Rosella: The Backyard Rivalry Explained Lorikeet vs. Rosella: Backyard Rivals? Picture your bird feeder. The Rainbow Lorikeets arrive like a boisterous sports team,…
-
Best Bird Feeders for Australia: Safe & Durable Picks Choosing the Best Bird Feeders for Australia Selecting the right bird feeder isn't just about attracting birds—it's about safety,…
-
Shelter for Backyard Birds: Create Safe Habitat Shelter for Backyard Birds: Creating Safe Habitat with Native Plants Food and water will attract birds, but shelter is what…
-
When to Stop Feeding Birds? An Australian Seasonal Guide When to Stop Feeding Birds: An Australian Seasonal Guide A common question from caring bird lovers is, "When…
-
Parrots in Your Backyard with Dogs or Cats: A Safe Guide You Want Parrots in Your Backyard, But You Have Dogs or Cats The dream of colourful parrots visiting…
📸 Gear: Start with What You Have (You Need Less Than You Think)
-
Your Smartphone is a Great Start: Modern phones have excellent cameras. Use it to learn composition and bird behaviour. Disable the flash—it will scare birds and ruin the shot.
-
A Basic Camera with a Zoom Lens: If you have a DSLR or mirrorless camera, a kit lens (like an 18-55mm) or a cheap telephoto zoom (55-250mm) is perfect to begin. You don’t need professional $2000 lenses.
-
The Most Important “Gear”: A Window. Your house is the best bird hide. You can get close without disturbing the birds.
You Might Also Like
-
Backyard Bird Water Bowls: A Complete Setup Guide Do Backyard Birds Need Water Bowls? Your Complete Setup Guide While much focus is on feeding birds, providing…
-
Backyard Bird Care: Essential Feeding, Water & Habitat Guide Backyard Bird Care & Feeding: Your Essential Australian Guide The Joy & Responsibility Welcoming birds into your backyard…
-
Common Bird Calls & Meanings: Decode Australian Songs Common Backyard Bird Calls & What They Mean That chorus outside your window isn't just noise—it's a complex…
-
Rosella vs Lorikeet: 8 Key Differences to Identify Them Rosella vs Lorikeet: Spot the Difference in Your Garden You glance out at your feeder and see a…
-
Can Birds Eat Bread? Why It’s Harmful & Safe Foods Can Birds Eat Bread? The Truth About This Common Practice Feeding ducks at the pond or tossing crusts…
-
🪟 Your #1 Setup: The Window Sill “Hide”
-
Pick Your Window: Choose one with a clear view of a bird bath, feeder, or a favourite perch. Morning or late afternoon light is best.
-
Conceal Yourself: Birds see movement. Sit inside, turn off lights behind you, and use a curtain or blanket to hide yourself and your camera. Shoot through a small gap.
-
Pre-focus: Manually focus your camera on the perch or feeder before the bird arrives. This means you’re ready to shoot instantly.
🌅 The Photographer’s Golden Rule: Light & Time
The quality of light defines your photo more than your camera.
-
The Golden Hours: Shoot during the first hour after sunrise and the last hour before sunset. The light is soft, warm, and casts beautiful shadows, making feathers glow.
-
Avoid Harsh Midday Sun: Bright overhead sun creates ugly, deep shadows and washed-out colours. If you must shoot then, look for open shade.
-
Position Yourself: Have the sun behind you, shining on the bird. This illuminates their colours and eyes.
Pro Tip: On a cloudy day, the soft, even light is excellent for capturing details without harsh contrasts—perfect for learning.
🐦 The Art of the Shot: Composition & Settings
Get on Their Level
Avoid shooting down on birds from a high window. If possible, position yourself at their eye level. This creates an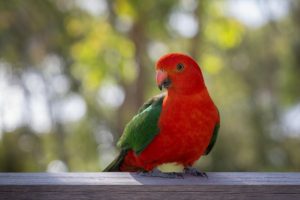 intimate, engaging perspective. It might mean sitting on the floor!
Fill the Frame
Get as close as your lens allows. Your subject should be the clear hero of the photo. Use your zoom or move your feeder closer to the window over time.
Focus on the Eyes
A bird’s eyes are the window to its character. Always ensure the eyes are in sharp focus. If the eyes are sharp, the photo will feel alive, even if the tail is slightly blurred.
Simple Camera Settings (For DSLR/Mirrorless Beginners)
-
Mode: Use Aperture Priority mode (A or Av). This lets you control the background.
-
Aperture: Set a wide aperture (a low f-number like f/5.6). This blurs the background (a nice effect called “bokeh”) and makes the bird stand out.
-
ISO: Set it to Auto ISO for now. Let the camera handle exposure while you focus on the shot.
-
Shutter Speed: In Aperture Priority, the camera will choose this. Just ensure it doesn’t go too slow (below 1/250th sec) for moving birds, or your photo will blur.
🤫 The Photographer’s Mindset: Patience & Ethics
-
Wait. Then Wait Some More: Bird photography is 90% waiting and 10% frantic clicking. Settle in, be quiet, and let the birds return to their natural behaviour.
-
Never Bait or Disturb: Your photos should never harm the subject. Never use glued prey, play recorded calls to lure birds (this stresses them during breeding), or trim vegetation to get a shot. Let the scene come to you.
-
Respect the Moment: If a bird shows signs of stress (alarm calls, refusing to approach), back off. The welfare of the bird is always more important than the photo.
❓ Frequently Asked Questions
Q: How do I attract more birds to photograph?
A: Provide the basics: a clean bird bath and appropriate food. A natural-looking perch (a nice branch) placed near the bath can create a perfect staging area for photos. Read our guide on Creating Shelter with Native Plants for long-term attraction.
Q: My photos are blurry. What am I doing wrong?
A: This is usually due to camera shake or a too-slow shutter speed. Ensure you’re holding the camera steady (lean against the window frame) or resting it on a beanbag on the sill. In bright light, your shutter speed will be faster and freeze motion.
Q: What’s one easy edit I can make to improve my photos?
A: Cropping. Use free software like Google Photos or your phone’s editor. Crop in to make the bird larger in the frame and remove distracting elements from the edges. It’s the simplest way to transform a decent shot into a great one.
Q: Is it okay to photograph nesting birds?
A: Extreme caution is needed. Use a long zoom and keep your distance. Your presence can attract predators or cause parents to abandon the nest. If in doubt, observe from afar and let them be.
Start simple. Master the light from your window. Learn the patterns of your regular visitors. The best camera is the one you have with you, and the best subject is the one that chooses to share your garden.
Inspired to attract more photographic subjects? Explore our complete Backyard Bird Care Hub for guides on food, water, and shelter.